Using the HDS Conference Client
The HDS Conference client establishes a teleconference between two video ViewStations. The video window from the users desktop is displayed side-by-side with the video window from a remote display; audio signals from each display are also transmitted and played on the ViewStation's speakers.
You start the HDS Conference client from the HDSperx window manager menu. It displays your own video image in the left-hand window. When you try to make a connection, your HDS Conference client tries to connect to the remote ViewStation; it will try to start an HDS Conference session on the remote ViewStation if one is not already running. The remote ViewStation pops up a dialog box report ing the request and asks the remote user to accept the conference session. If it is accepted, the remote ViewStation's video image appears in the right-hand window.
HDS Conference automatically sends video when it starts. If the Audio Device is set to "Callport Spkr/Mic" or "HDS Headset", it automatically sends Audio too. For other audio device selections, you must press and hold the "Hold to Talk" button to send audio.
This is the HDS Video Conference client:
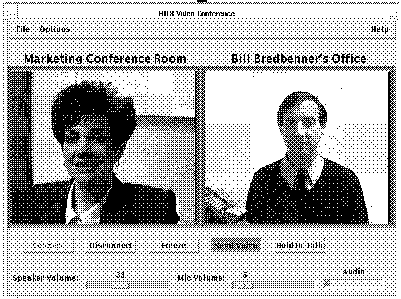
The "File" menu offers a "Quit" option.
The "Options" menu offers three submenus:
-- Video Controls - to control the video image from the ViewStation's camera
-- Audio Controls - to control the audio levels of the ViewStation's input
-- Network Controls - to control the "Quality" and report network activity
There are a number of buttons available to control the HDS Conference session.
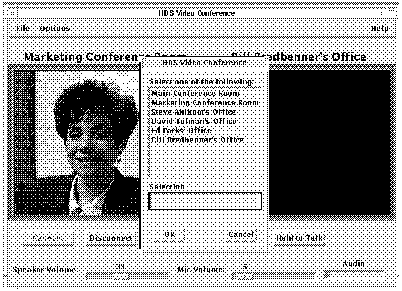
Connect - this button brings up a dialog box asking for the name or IP address of the ViewStation to which you want to conference.
You can also create a list of commonly used hosts (their names must be resolvable by name server) with an appropriate label for each which will be displayed above the window (such as the "Main Conference Room" name above). This list is a simple text file with a name or IP address along with the label. The file is in /FXUtilities/hds-fx/hdsvideo/lib/HDSconf.list.
The HDSconf.list file looks like this:
# The # comment character can be used only at the beginning
of a line.

#

# Add your own entries below:

123.123.123.120   Main Conference Room

123.123.123.140   Marketing Conference Room

steveafx   Steve Ahlbom's Office

mkt26   David Tolman's Office

eng14   Ed Parks' Office

123.123.123.189
Bill Bredbenner's Office
The "Connect" button brings up a chooser box for the hosts listed in the HDSconf.list file, as shown in this example. You can enter the list appropriate for your site and environment and make the connection by clicking on the name you want. The names in this file must be resolvable by your domain name server.
Disconnect - this button disconnects the HDS Conference session.
Freeze - this freezes the incoming image. This button is a toggle button.
Mute - this button mutes the incoming audio. This button is a toggle button.
Send Video - this button transmits live video. If you don't click this button, the image is not sent; this is useful for pausing the conference while you conduct some off-line conversation.
Hold to Talk - this button controls whether your audio signal is transmitted to the other ViewStation. When the Audio Device is set to the Callport Spkr/Mic or to the HDS Headset, audio is transmitted automatically. Otherwise, you must select it with the left mouse button and hold it down while you speak. This allows you to control what conversation is sent and also to reduce the network activity by not transmitting any more audio data than necessary.
Speaker Volume slider bar allows you to control the audio level of the speakers.
Mic Volumeslider bar allows you to adjust the local microphone level. If you adjust the microphone volume, look at the Audio meter to see that the signal ranges remain in the green range. Sustained red audio levels result in a poorer sound quality.
The Audio: bar is a signal strength meter that continuously monitors the audio level, with green levels indicating good audio and red levels indicating too much volume.
The video images are received by each ViewStation as analog signals. They are then converted to digital images, compressed, and sent as packets across the Ethernet connection between the two ViewStations, where the receiving ViewStation uncompresses them and displays them on the screen in the HDS Conference window.
There are several things to observe about this process. The compression done by the ViewStation is variable based on the image itself, and adjustable by the user. The compression technique examines the image and transmits only parts of the image which were changed from the previous frame - so a relatively static image, such as a person talking, has less actual data transmitted than a full-motion image. The picture quality of the received image will vary based on this volume of data, first because of the network constraints, and second, because of the level of compression selected by the user.
The Video Controls - HDS Conference Menu
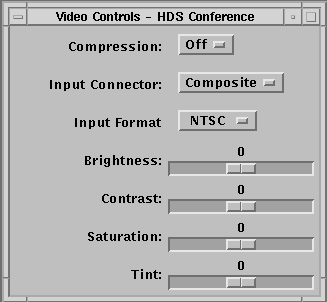
This menu allows you to select several things about the HDS Conference video on your ViewStation.
Compression - On or Off. This affects the quality of the transmitted image. You may want to select Off if the image is relatively static and the network is relatively open. This is also variably adjustable with the "Quality" slider on the Network Controls menu.
Input Connector - Composite or SVideo. You would use this only if you have an SVideo input connector.
Input Format - NTSC, PAL, or SECAM. There are slider bars to adjust your local video image:
Brightness
Contrast
Saturation
Tint
The Audio Controls - HDS Conference Menu
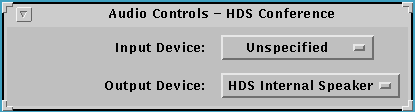
The Audio Controls menu offers two selections:
Input Device: This lets you select the Audio Input device you have installed. Options are: Unspecified, HDS ViewCam, HDS Headset, CallPort Spkr/Mic, HDS Microphone, HDS Tuner, VCR, and Line Level Audio. This selection can also be made in Setup Mode from the User Preferences menu.
Output Device: This allows you to specify the Audio Output device you have installed. Options are: HDS Internal Speakers, External Speakers, HDS Headset, and CallPort Spkr/Mic. This selection can also be made in Setup Mode from the User Preferences menu.
The Network Controls - HDS Conference Menu
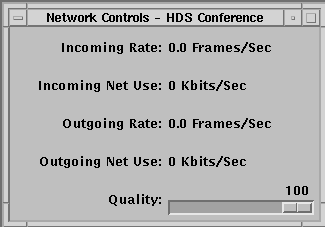
The Network Controls menu reports the current state of the HDS Conference session, with data on the frame rate and network usage for both the incoming and outgoing video images. These values report actual network usage and reflect the working of the HDS Conference session - how much data is transmitted (based on the content of the image and the compression selected) and the network load.
These values can be adjusted with the "Quality" slider bar. This lets you select the level of compression that the ViewStation uses on the video image.
Quality set at 100% selects the maximum quality of the video image, which means that the ViewStation will send every frame in its entirity, which in turn means that the frame rate will probably decrease. The consequence will be a high quality image, but less smoothness of motion.
Quality set at 0% selects minimum quality of the video image, which usually means that the ViewStation sends only the parts of each frame that have changed significantly from the previous frame. The result is that the frame rate is high, with good motion but somewhat less quality of the images themselves.
This Quality setting is a highly subjective choice and will depend on the objectives of your conference session. The actual frame rate is also greatly affected by the motion within the image and other network usage. You will probably want to experiment a little to see the consequences of these selections.
HDS Conference Video Client Manual Page
This is the HDS Conference manual page.
 Return to the Home Page