Using the HDS Video Client
The HDS Video client displays analog video on the ViewStation from any ordinary video input, including cameras, TV tuners, VCRs, etc.
This client displays high-quality live (30 frames/sec) video from an analog source. It can display up to 4 simultaneous live video windows. The windows can be resized, even to full-screen size, though their aspect ratio is constant. They can be handled as normal X windows by your window manager. There are options to freeze or capture the image, as well as integrated audio capabilities.
Connect either the camera or the tuner (or other analog video input) to the ViewStation's video input. This connection varies with the input device, but is usually a very simple matter. There are no settings or jumpers to set. The NTSC and PAL signal formats are detected automatically; SECAM formats must be selected on the Options menu. For optimum performance with the PAL format, use the Options menu to select "PAL".
Connect the HDS ViewCam Camera
Any common video camera, VCR, camcorder, etc. can be connected to the ViewStation. The phono plug video connector accepts any NTSC (or PAL or SECAM) input.
The HDS ViewCam comes with an AC transformer with cable, and a connecting cable. It is auto-focusing. There is a power switch on the side and buttons for adjusting the contrast.
1. Plug in the AC transformer connector to the socket on the back of the camera.
2. Plug the HDS ViewCam's video connector into the back of the camera and then plug the video connector (phono jack with yellow cover) into the ViewStation's video jack located on the back of the ViewStation base.
3. Connect the HDS ViewCam's two audio phono jack connectors to 3.5 mm stereo adapter (supplied), and then plug that into the ViewStation's input audio jack.
Set Up the Audio Connections
Audio signals accompanying the video, whether from the microphones built into the camera, or from a VCR, or the from the HDS tuner, etc. are controlled by the local HDS audio client whose controls are integrated into the video clients window. The audio input and output jacks on the ViewStation's back panel should be connected to the microphones/speakers, etc. as needed (the HDS ViewCam has microphones built into the camera head). Make the appropriate selections for internal/external speakers, microphone type, etc. from the Audio Device menus in Setup Mode (User Preferences menu).
Refer to HDS Audio Operations for details of the operation of the HDS Audio client.
Start an HDS Video Window
Start the HDS video client by pulling down the HDSperx menu with the right mouse button and clicking on the "HDS video" line. The video control menu appears.
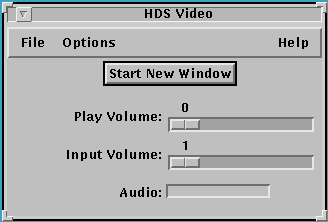
The "File" menu offers a "Quit" option to close the HDS video client.
The "Options" menu offers submenus for Video and Audio controls, which are described in detail below.
The "Help" menu offers a brief description of the HDS video client.
There is a button to open a new video window (with settings as specified). There are also slider bars for "Play Volume:", which is the audio signal level sent to the speakers. The "Input Volume:" slider bar is for the audio gain of the input signal; this should normally be left at 1 (one).
The "Audio:" bar is a signal strength meter that continuously monitors the audio level, with green levels indicating good audio and red levels indicating too much volume.
The Video Controls Menu
This menu offers a number of selections:
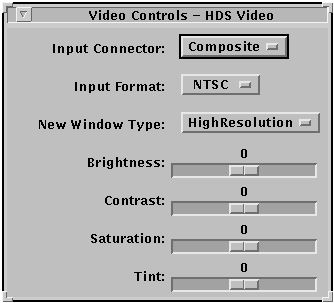
Input Connector: Composite or SVideo. Note that the SVideo selection also requires a different connector on the ViewStation.
Input Format: NTSC or PAL or SECAM.
New Window Type: HighResolution or LowResolution. This specifies the resolution used by the "Start New Window" button. The "HighResolution" starts an interlaced video window (the most frequent choice), and "LowResolution" starts a non-interlaced window. Two High Resolution windows can be displayed simultaneously; four Low Resolution windows can be displayed simultaneously.
There are slider bars for Brightness, Contrast, Saturation, and Tint.
The Audio Controls Menu
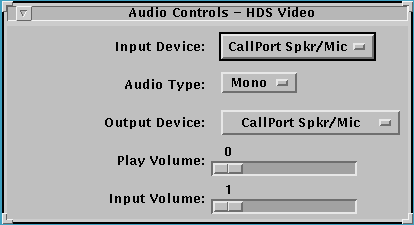
The Audio Controls Menu offers a number of selections:
Input Level: Microphone, Dynamic Microphone, Boosted Microphone, and Line. These choices permit installation of microphones with different signal levels. Check your microphone type to select the appropriate field.
Audio Type: Mono or Stereo. This selects either mono or stereo audio.
Output Type: Select the appropriate field either in this menu, or in the Audio Device Setting menu in Setup Mode.
There are also slider bars for "Play Volume", which is the audio signal level sent to the speakers. The "Input Volume" slider bar is for the audio gain of the input signal; this should normally be left at one.
The HDS Video Window
The HDS Video window created when you click "Start New Window" is a full- motion display (30 frames/sec) of the analog input.
There are a number of controls on the video window frame, including:
Freeze: This temporarily stops the display. This is a toggle button.
Mute: This temporarily stops the audio output. This is a toggle button.
Snapshot: This makes a snapshot copy of the video image and displays it in a separate window on the screen. This image can then be copied or manipulated by normal X graphics processing controls (an example) follows.
Done: This closes the video window.
Play Volume: There is a slider bar for audio level control.
HDS Video Window
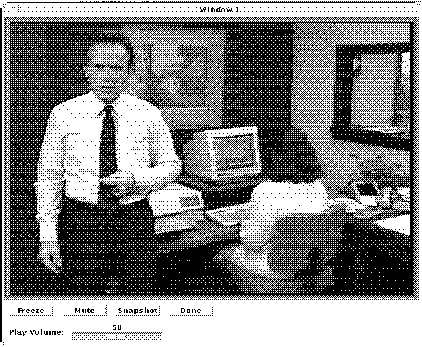
Capturing an Image from the HDS Video Window
It is simple to capture an image from the HDS video window. All you have to do is click on the "Snapshot" button. This creates a full-color window of the video image as a separate window.
The snapshot window may have its own colormap, so it might not display correct colors unless the pointer focus is in the snapshot window. This sometimes occurs because the snapshot window allocates 128 colors. and creates a private colormap if 128 colors aren't available on the server. If the snapshot has a private colormap, the screen will show colormap flashing as you move the cursor in and out of the window. The final image will have a full complement of correct colors.
You can import the snapshot window into documents directly, such as Framemaker that have a capture option. This typically uses an .xwd (X Window dump) graphics format. You can also use other X graphics programs, such as Xwd, xv (Xview), or ImageMagick, to write your snapshot to a file. These programs also allow you to crop or resize, or convert the format, of the snapshot image.
HDS Video Client Manual Page
This is the HDS Video manual page.
 Return to the Home Page