Setup Mode Operation
The operation of Setup Mode is intuitive, with a Main Menu showing buttons and boxes for ViewStation local clients and a Setup Options button containing layers of menus offering you choices and editing fields for other settings. Mouse movement selects different options and the left mouse button clicks select an indicated button or option. The selections are shown in reverse video and for important changes you are asked to confirm your selections with another submenu. The discussion that follows helps you understand the contents of the fields and what selections are available. It can also help you see the forms addresses must have, the range of values permitted for a particular field, and so on.
Setup Mode Main Menu
Setup Mode is a Client application program (an X client) run locally by the ViewStation. It is active all the time, acting either by itself or concurrently with other clients. The only difference is that Setup's window cannot be resized, though it can be moved or iconified with a window manager client.
Setup Mode Heading Bar
The top bar of the Setup Mode Main Menu contains configuration information about the ViewStation, including the monitor resolution, installed memory, the firmware version, whether the ViewStation is running from its flashPROM or from the network, and the assigned IP address (after you have entered it and rebooted).
Setup Mode Selection Buttons
Setup Mode has a Main Menu containing buttons to select various ViewStation clients, or to display information about the ViewStation. Selecting the Setup Options button from the Main Menu brings other pull-down menus onto the screen with more detailed information or options. You select an item by moving the mouse cursor to the item, which will be displayed in reverse video, and clicking on it with the left mouse button.
Each selection from the Main Menu will be discussed, and the pull-down menus shown with definitions and recommendations for settings for each field. The Setup Mode Main Menu is shown below:
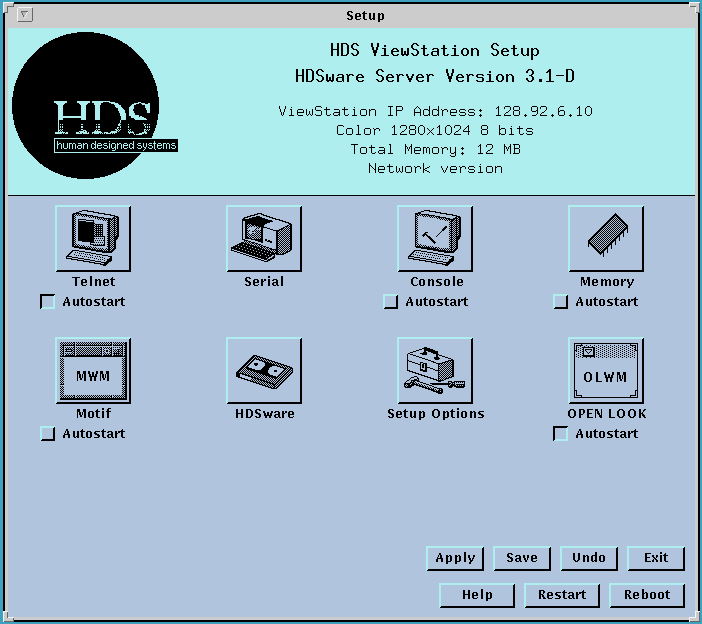
When you make changes to a Setup Mode field, in some cases the change will be effective immediately, such as User Preference items. In other cases, you must click on the Apply Changes button or restart the ViewStation for the settings to take effect, as with setting the IP address. The settings can be saved into Non Volatile Memory (using the Save button) so they are always available on power up.
A message line at the bottom of the Setup Mode window tells you what is necessary to make the changes effective, whether clicking on the Apply Changes button or restarting the ViewStation. A message also appears next to some fields indicating "At restart: <this value>".
Setup Mode Function Buttons
The cluster of buttons in the lower right corner of the Main Menu let you execute various functions, which are described below in more detail.
The Apply button executes the changes you have made so they are effective immediately. Some settings, like the IP address, are only effective after you restart the ViewStation. The required action is shown on the bottom of the Main Menu. This button applies the changes, but you also may want to save them in NVM. If you don't save them, these applied settings will stay set only until you turn the ViewStation off.
The Save button applies the changes and saves the settings you have made in Setup Mode into the ViewStation's Non Volatile Memory. These settings will be used whenever you turn the ViewStation on. You are asked to confirm this action with another pop-up menu. If you use the remote configuration feature, some NVM settings will be set from the Configuration file. These settings and the user settings will be merged at powerup, with the config file's settings over riding the corresponding NVM settings.
The Undo button allows you to remove any changes you've made in Setup Mode since your last Save in NVM or Apply Changes operation and restores the settings which were in effect before you began your current Setup Mode session. You are asked to confirm this action with another pop-up dialog.
The Exit button executes an Undo Changes command and allows you to exit the Setup Mode client and return to your other processes. When you exit Setup, the Setup icon again returns to the lower right part of the screen. Note that if your window manager uses icons as part of its graphical interface, the ViewStation's Setup Mode will be treated like any other X client, with a header bar and icon. In that case, you probably won't want to exit Setup Mode from this menu, but just iconify it.
The Help button shows you how to use the Help function. If you want more information about any button or function, move the pointer to the button and press the right mouse button. A message will appear describing the button you've selected.
The Restart button terminates all the ViewStation's current clients and starts the ViewStation again. A pop-up dialog asks you to confirm the selection.
The Reboot button reboots the ViewStation, either from flashPROM or from the Network, as you have specified in the Startup Options menu. A pop-up dialog asks you to confirm the selection. A more complete set of restart and reboot options, including ROM or Network restarts is available from the Restart and Reset menu shown below from the Setup Options menu.
 Return to the Home Page